Small iPad keyboards make typing uncomfortable. In light of this, the keyboard needs to be bigger.
One primary reason the iPad keyboard usually gets small is that the iPad pencil is active. You can easily drag the iPad pencil to any location on the screen because it operates on a keyboard that has been reduced in size.
Quick Answer
To revert your iPad keyboard to its original size, you should use your two fingers to zoom it out. The best fingers to use to zoom it out are, preferably, your thumb and index finger.
You’ll learn how to modify your iPad’s keyboard in this post. You will also have a list of iPad external keyboards you can use rather than an Inbuilt keyboard.
Table of Contents
How to Make the Keyboard Bigger on An IPad
An iPad keyboard can be enlarged in a variety of ways. For instance, you can zoom out the keyboard, rotate it to landscape position, or use an external keyboard.
The various methods for enlarging an iPad keyboard are listed below.
Method #1: Zooming Out the Small Keyboard
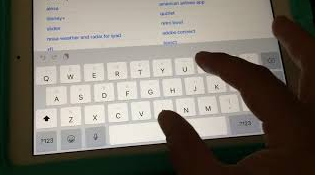
To make your iPad keyboard bigger, use your thumb and index (first) finger to zoom out the tiny keyboard.
Method #2: Removing the IPad Split Keyboard
In order to restore your keyboard to its original size and remove the iPad split keyboard, you should do the following.
- Go to a messaging app or your browser app to type in a text to make the keyboard appear.
- Long-press the keyboard button in the lower-right corner of the keyboard.
- When you slide up your finger, two options appear. You can slide it up to “Merge” or slide it to the “Dock and Merge” option.
Keep in Mind
Only iPads with a home button have a split keyboard.
Method #3: Using Landscape Mode
Landscape mode on an iPad is another simple method for enlarging the keyboard.
To use the keyboard in the landscape position, rotate the iPad to 90 degrees. Your iPad’s keyboard will fill the entire screen when it is in landscape orientation.
Method #4: Turning on the Full Keyboard
Apart from using the “Display” zoom feature to zoom in on your iPad keyboard, you can use the Magic Keyboard shortcut to enlarge your screen. The methods are listed below.
- Go to Settings.
- Click “Accessibility”.
- Choose “Full Keyboard Access”.
- Turn on the “Full Keyboard”.
Method #5: Enlarging the Keyboard Using Shortcuts
You can increase the size of the keyboard on the iPad by pressing shortcut buttons.
Following are instructions for using shortcut buttons to expand the keyboard.
- Customize the keyboard shortcut, and click “Command”.
- Change the focus display, then tap the subsequent options. The keyboard options are auto-hide, increased size, high contrast, and color.
- If you want to increase the keyboard, you should select “Increase Size”. The keyboard size you want to use can then be chosen.
Method #6: Changing the Keyboard Layout
Setting a different layout on the iPad keyboard is another way to enlarge the keyboard.
To set a different layout on your iPad keyboard, you should do the following.
- Open your Settings.
- Tap “General”.
- Select “Keyboard”.
- Go to the top of the screen and set your preferred keyboard language.
- A list will appear; select “Alternate Layout”.
Method #7: Using An External Keyboard
Rather than using the inbuilt keyboards to type, which may feel uncomfortable at times, you can use the iPad keyboard. The majority of iPad external keyboards are portable and robust.
More significantly, these keyboards safeguard your iPad simply by closing them after use. They all come with a magnet that makes the attachment possible. Additionally, they are all suitable for iPad typing.
The best external keyboards, as rated highly by many iPad users, are listed below.
Magic Keyboard
The Magic Keyboard has a floating cantilever design, backlit keys, and a built trackpad.The iPad Pro and iPad Pro Air versions work very well as well.
It also has a USB port for charging and a back cover to protect the keyboard and your iPad screen.
It is compatible with iPad Pro 12.9‑inch (3rd, 4th, and 5th generation), iPad Pro 11‑inch (1st, 2nd, and 3rd generation), and iPad Air (4th and 5th generation).
Smart Keyboard Folio
In comparison to the Magic Keyboard, the Smart Keyboard Folio is similar. However, it also offers front protection in addition to back safety. With this keyboard, you can alternate between two viewing angles.
It is compatible with the following iPads: iPad Pro 12.9‑inch (3rd, 4th, and 5th generation); iPad Pro 11‑inch (1st, 2nd, and 3rd generation); iPad Air (4th and 5th generation).
Smart Keyboard
When watching videos or writing emails, the Smart Keyboard can be folded into a variety of positions. It comes with a front-end cover, and it is lightweight.
It is compatible with iPad (7th, 8th, and 9th generation), iPad iPad Pro 10.5-inch, third-generation Air, and.
How Do I Get My IPad Keyboard Back to Normal
It appears that either you or another person made an error when changing the keyboard settings if you notice that your keyboard has shrunk in size or is floating on your screen rather than docked to the bottom. But there is a quick and simple solution to this; all you have to do is adhere to the instructions below or watch the video.
- Open any app that has a text box.
- Now tap that text box so that your on-screen keyboard pops up.
- If your keyboard is small, simply place two fingers in the middle and spread them in a zoom-in motion. Your keyboard should now be using the complete layout as a result.
- If your keyboard is split up to different sides of your screen, simply tap the keyboard icon on the bottom right corner of your right-side keyboard, and choose Merge. Your split keyboard should come together as a result.
- If your keyboard is floating on your iPad screen, you can tap the earlier-mentioned keyboard icon and choose Dock & Merge instead of Dock.
Customizable Settings for IPad Keyboard
Now that the iPad keyboard is functional in its default configuration, let’s discuss some of its customizable features because some of them can improve your typing experience. Let’s take a closer look at some of these customizable features, such as alternative keyboards, settings, time-saving shortcuts, and easter eggs.
- Spell-checker: That’s right—the iPad has a built-in spell-checker that not only points out any mistakes you might have made while typing but also suggests the right spelling when you tap on a word.
- Predictive text: Once the AI is accustomed to your typing style and has a better understanding of you, predictive text can become startlingly accurate. Words should start to appear at the top of your keyboard once it recognizes your typing patterns. This can save you time and effort by eliminating the need to manually type each word. However, use caution because it can occasionally predict odd words.
- Split keyboard: A split keyboard can make it easier to type as you would on a smartphone, as we already mentioned. This can be helpful when you don’t have access to a desk where you can set up your iPad. In order to allow you to type with your thumbs, the split keyboard divides the standard keyboard into two sections on either side of your screen. Simply tap the keyboard icon in the bottom-right corner of your keyboard and select Split to make this option available.
- Alternate keyboards: You can download and use third-party keyboards on your iPad by going to the App Store. Because they are secure to use, these can be found on the Apple App Store. Keyboards like SwiftKey, GBoard, and Grammarly can be a lot of fun because some of them have themes and unique features that you might like. On Apple’s keyboard page, you can read more about customized keyboards.
- Text Replacement: Fortunately, the iPad has this feature as well. It’s one of the best aspects of our smartphones. You can use text replacement to enter shortcuts, and iPadOS will replace them with longer words or a word of your choice. For instance, the iPad keyboard will change the word “government” to “gov” if you type “gov” instead of “gov.” When you need to repeatedly type a lengthy word and want to save time, it is useful.
- Special characters: The fact that you can type special characters on your iPad keyboard is a little-known fact. Simply long-press an alphabet to display alphabets with diacritical marks, then slide your finger to select one. Simply press and hold the “0” number key, for instance, to enter a degree symbol!
- Dictation: Why type by hand when you can just tell your iPad to? Yes, you have the option to use your keyboard’s voice-to-text feature, and according to all of our tests, it’s also fairly accurate. To activate it, in case it’s not already activated, simply navigate to Settings > General > Keyboards and toggle the switch next to ‘Enable Dictation.’
- Slide to type: According to rumors, once you get used to typing with slides, you’ll never switch back! Although it didn’t work for us writers, perhaps it will for you? The iPad supports this typing method, and you can enable it by going to Settings > General > Keyboards, where you can see a toggle button next to Slide to Type. By enabling this, you’ll be able to type instead of tapping each alphabet as you move from one to the next.
- Other settings that you can toggle on your keyboard include Auto-Correction, Enable Caps Lock, Smart Punctuation, Character Preview, and Emoji Stickers.
If you prefer a physical keyboard, you can completely avoid using the on-screen keyboard by pairing it with your iPad using Bluetooth.
How to Create IPad Keyboard Shortcuts
Imagine that you frequently use a phrase or word in emails related to your work or studies, and that typing it repeatedly is a hassle. You can set up a shortcut for that word so that when you type an abbreviated version, the keyboard automatically replaces it with the full version. For instance, you could add a shortcut under “ABS” if you work in the automotive industry and frequently type “Anti-Lock Braking System.”‘ Every time you type “ABS,” the keyboard will automatically change it to “Anti-Lock Braking System.”
Here are the steps to do this:
- Go to Settings > General > Keyboards.
- Look for Text Replacement and tap it.
- Inside this section, you will see a ‘+‘ sign in the top right corner to add a shortcut. Tap it.
- Now you will see two text boxes — one saying Phrase, and the other Shortcut.
- You must enter the entire word for which the shortcut is being created in the “Phrase” box; in our example, that would be “Anti-Lock Braking System.”‘
- Subsequently, enter “ABS” in the Shortcut box.’ After this, tap Save in the right-upper corner.
- Now each time you type ‘ABS’ in email apps or even in browsers, it will be replaced with the phrase ‘By your keyboard, there is an ALB system.
Apple iPad Saved Keystrokes as Text Replacements
Change Keyboard to QWERTZ Or AZERTY
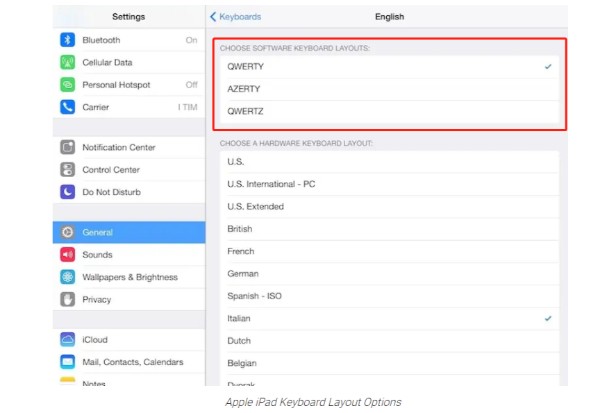
Although QWERTY may be the most popular keyboard layout, some people actually prefer the AZERTY or QWERTZ layouts because they are more typical in places like Europe. How to switch the standard English keyboard’s QWERTY layout to AZERTY or QWERTZ is shown below.
- Navigate to Settings > General > Keyboards.
- Inside Keyboards, you should see English (US) and any other languages that you may have added.
- Tap on English (US), and you should now see three options — QWERTZ, AZERTY, and QWERT.
- Choose the layout you are comfortable with, and the checkmark should appear next to it.
- You should see the updated layout the following time you tap a text box to open your keyboard.
Conclusion: 7 Methods to Make the Keyboard Bigger on IPad
By zooming out, you can enlarge the iPad keyboard. If using the iPad keyboard is still uncomfortable for you, try the alternative methods described in this article to get the most use possible from it while still making it comfortable.
FAQs
Why is the Keyboard Small on My IPad?
Given how easy it is to change the size of your keyboard with the wrong hand movement, there is a chance that you may have done so unintentionally. Simply press down on the keyboard with two fingers spread apart, as if you were zooming in on an image, to return to the full-size keyboard’s default setting. It then instructs the keyboard to revert to its large size. The same principle applies to returning to the small version; all you need to do is pinch inward.
Why is My Keyboard Split on My IPad?
Since it enables thumb-typing like on smartphones, the split keyboard is frequently used by users. If your iPad has a split keyboard, it must have happened accidentally while it was being used. On the right side of your keyboard, in the bottom right corner, look for the keyboard icon to return to the original default layout. Tap that, and you should see an option called Merge. Simply press it to return your keyboard to the large QWERTY layout.